Digilent社에서 발매한 Arty Z7-20 board에 PetaLinux 올리기.
Vivado, Vitis 등을 이용해 xsa, bit file을 먼저 생성해야 하나 이미 생성된 파일을 재사용 가능해서 이 부분 관련 기록은 다음으로 미루기로 함.
개발 환경
- Host OS : Windows10 또는 Windows11
- Virtual OS : Ubuntu 18.04.6 LTS
- PetaLinux : V2020.1 final
- Target B'D : Digilent Arty Z7-20
- Boot image 저장 : Micro SD 64GB

Xilinx社 Reference Guide : UG1144 PetaLinux Tools Documentation (2020.07.24 - v2020.1)을 참조하여 진행하며,
최신 내용(개정판)은 아래 링크에서 UG1144 검색하여 확인 가능함.
(현재 시점 최신 개정판은 2023.05.16 - v2023.1 이나 여러 버전을 build해본 결과 v2020.1-final만 정상 build 확인)
Homepage • AMD Adaptive Computing Documentation Portal (xilinx.com)
AMD Adaptive Computing Documentation Portal
docs.xilinx.com
PetaLinux build를 위한 source는 아래 link에서 다운 받을 수 있으며, v2020.1-final을 사용함
Downloads
Vivado, Vitis, Vitis Embedded Platform, PetaLinux, Device models
www.xilinx.com
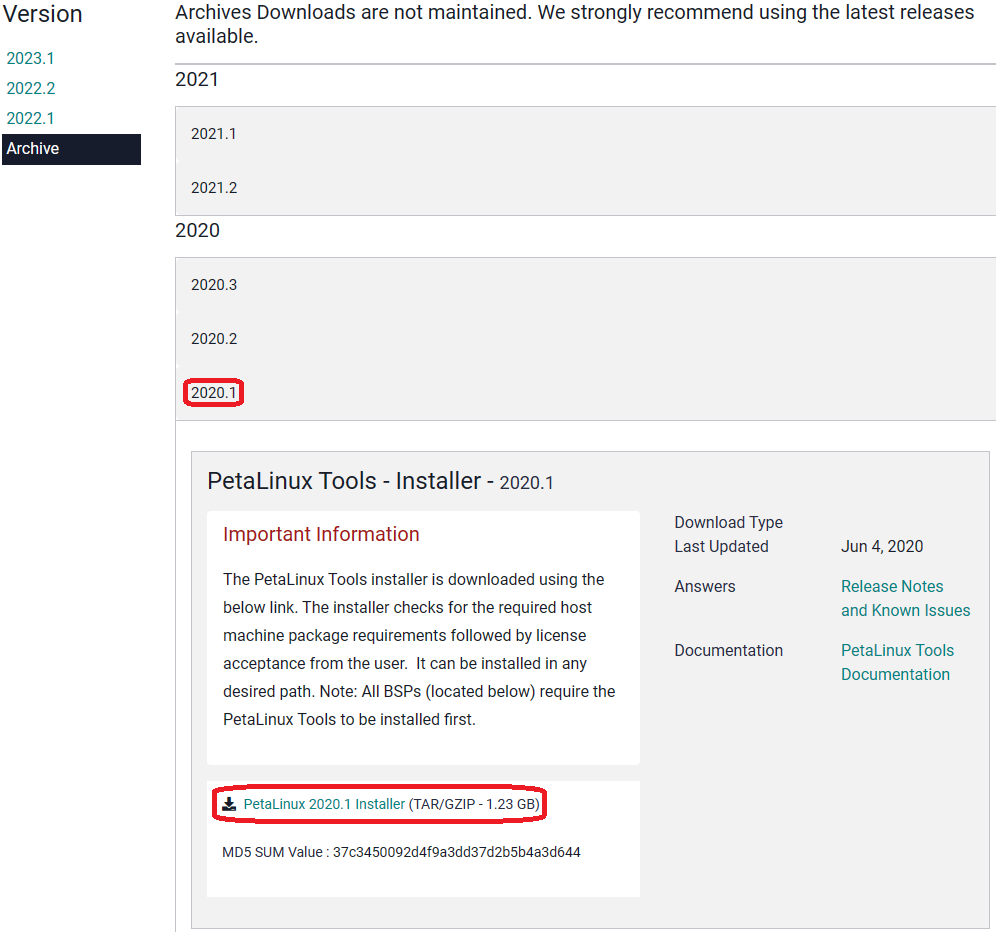
다운로드 링크에서 PetaLinux Tab - Archive로 이동,
2020.1을 클릭하고 Drop-down 메뉴에서 PetaLinux 2020.1 Installer (TAR/GZIP - 1.23 GB)를 클릭하면
petalinux-v2020.1-final-installer.run file이 download됨.
Ubuntu에서 직접 받거나 윈도우 환경에서 download 후 VirtualBox 공유 폴더에 이동해 사용.
※ PetaLinux build의 단계
1) PetaLinux build tools 설치
2) PetaLinux source code 압축 해제
3) PetaLinux build 환경 설정
4) PetaLinux project 생성 및 기본 설정
5) PetaLinux build
6) PetaLinux boot image 생성
7) PetaLinux image download 및 Board booting
1. PetaLinux build tools 설치하기
1) PetaLinux source code를 build하기 위해 필요한 프로그램들을 설치하기
아래 링크에 접속하여 페이지 하단 plnx-env-setup.sh 파일을 다운받기
Homepage • AMD Adaptive Computing Documentation Portal (xilinx.com)
AMD Adaptive Computing Documentation Portal
docs.xilinx.com
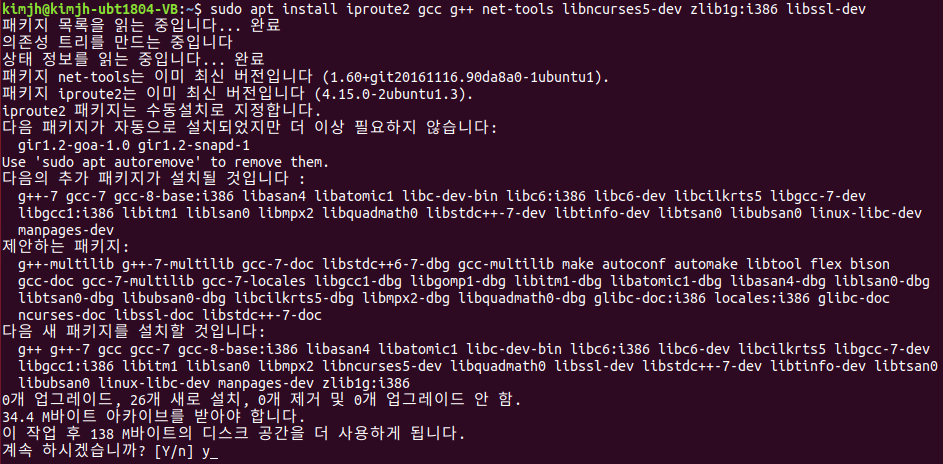
2) 다운 받은 script를 실행해서 build에 필요한 프로그램들을 설치 가능하나 제대로 build되지 않는다는 글을 확인.
아래 command를 통해 의존성 프로그램들을 직접 설치함.
~$ sudo apt install iproute2 gcc g++ net-tools libncurses5-dev zlib1g:i386 libssl-dev
~$ sudo apt install flex bison libselinux1 xterm autoconf libtool texinfo zlib1g-dev
~$ sudo apt install gcc-multilib build-essential screen pax gawk pylint3 cpio
~$ sudo apt install python3 python3-pexpect python3-pip python3-git python3-jinja2
~$ sudo apt install xz-utils debianutils iputils-ping libegl1-mesa libsdl1.2-dev
2. PetaLinux source code 압축 해제
1) PetaLinux V2020.1 압축 파일을 VirtualBox 공유 폴더에 이동해 두고 Ubuntu에서 확인
~$ ls -alh ~/share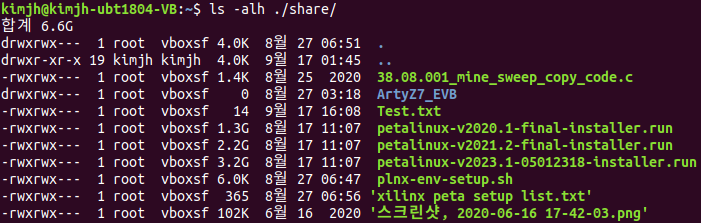
2) Zynq7000 관련 Project를 관리하기 위한 directory 생성
~$ mkdir xilinx
~$ cd xilinx
~/xilinx$ pwd
/home/kimjh/xilinx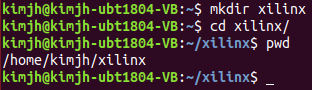
3) petalinux-v2020.1-final-installer.run의 압축 해제
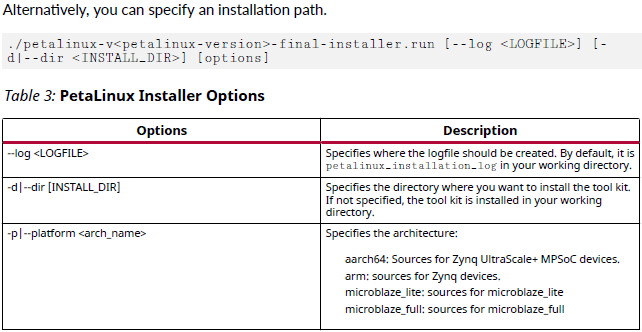
./petalinux-v2020.1-final-installer.run 명령만 실행해도 압축 해제 가능하지만 log도 남기고, 지정 위치에 압축해제를 위해 아래처럼 옵션을 설정하고 압축 해제 실행함
~/xilinx$ cd ~/share
~/share$ ./petalinux-v2020.1-final-installer.run --log peta-v20.1f.log -d ~/xilinx/petalinux-v20.1f
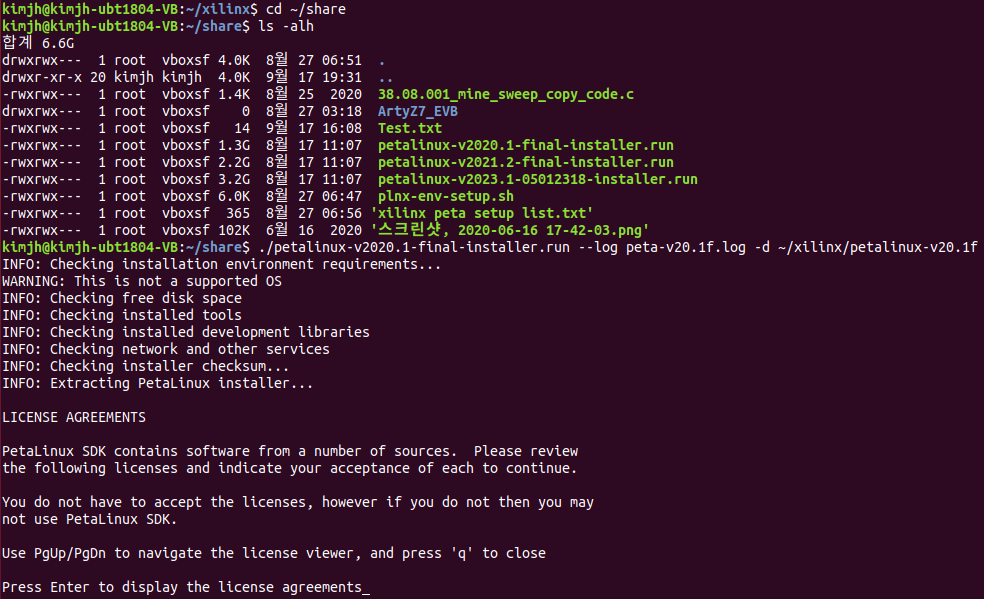
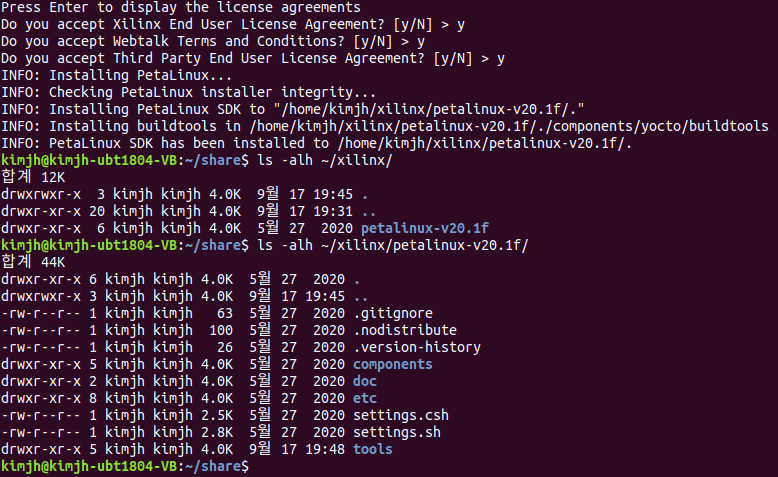
Press Enter to display the licese agreements 메시지가 나오면 Enter key를 눌러 license 화면을 띄운 뒤 q를 눌러 빠져나오고 y를 눌러 계속 진행 ← 3회 반복 후 PetaLinux code 압축 해제 시작.
캡쳐 마지막 줄 메시지처럼 지정된 ~/xilinx/petalinux-v20.1f에 압축 해제 진행됨
PetaLinux build 환경 설정부터 Arty Z7 board에 PetaLinux를 올려 부팅하는 내용은 다음 글에서!
'전자 관련 이야기 > Embedded' 카테고리의 다른 글
| Digilent Arty Z7 - PetaLinux #2 (0) | 2023.10.03 |
|---|---|
| Vitis Compile error (0) | 2023.09.01 |